
National Safe Boating Week is a great time to inspect life jackets - BoatUS Foundation shows you how
by BoatUS 13 May 11:28 PDT
May 17–23, 2025
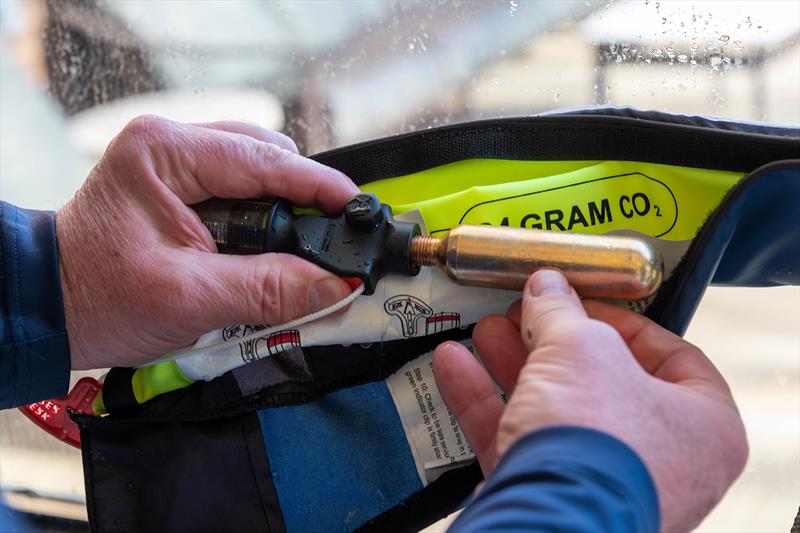
Inspecting the CO2 cylinder on inflatable life jackets is an easy annual task © Stacey Nedrow-Wigmore / BoatUS
Every year National Safe Boating Week (May 17-23) helps remind boaters to make safety a priority all summer long, and of the need for having serviceable, right-sized life jackets for everyone aboard the boat.
On top of that, it's essential jackets are worn, or at a minimum, readily available and not buried at the bottom of a locker and hard to reach. And it's also important that they are in good condition to ensure they will work when you need them the most.
Taking a few minutes for a simple life jacket inspection now, at the beginning of summer boating season, will help put all uncertainties at ease. The nonprofit BoatUS Foundation offers the following life jacket inspection tips for National Safe Boating Week.
Annual inspection for inherently buoyant life jackets (noninflatable):
- Check all hardware and straps. They should be in good shape, firmly attached and in working order. Heavily oxidized buckles, worn strapping or loose stitching mean it could be time for replacement.
- Ensure that there are no rips or tears or punctures in the fabric. If you can see any encapsulated floatation material inside between the life jacket's fabric's inner and outer layers, it's time to replace. You also don't want any lumpy or hardened buoyancy material, oil saturation, or mildew, all of which weaken fabric.
- Make sure that the label stating U.S. Coast Guard approval is attached and that it is readable. This may also help a potential on-water boating safety check as law enforcement will know you've done the right thing by having a right-sized life jacket, especially for the kids.
- Got any extras attached to the life jacket? Test any strobes or personal locator beacons, and verify battery expiration dates and replace if needed.
Annual inspection for inflatable life jackets:
- Open up the life jacket. Don't be worried you won't know how to repack as they all come with simple repacking instructions on an inside flap. The process becomes more intuitive after you do it a couple of times. Trust us.
- If the shell (cover material) is dirty, spot clean with a damp rag or hand wash in warm water using mild soap, then rinse with fresh water (being careful to keep the auto-inflator dry, if it has one). Never dry clean your inflatable or use harsh chemicals (such as bleach or ammonia) to clean it. After washing, hang it on a plastic coat hanger and allow it to air dry out of direct sunlight; never dry by applying direct heat.
- Once dry, inspect all parts, including the shell, webbing, stitching, pull cord, straps or buckle snaps, for wear or damage.
- Inspect the inflation system by unscrewing the CO2 inflation cylinder. These cylinders may have no expiration date, but check for corrosion. The two main types of automatic inflatables are hydrostatic (pressure-sensing) and bobbin type (water-soluble) auto-inflation systems. If the unit has a hydrostatic inflator, verify that it is not expired. If a bobbin type, verify that the white "pill" is intact and hasn't begun to crumble, and the bobbin hasn't expired past the date printed on the plastic housing. Some bobbins may only have a printed date of manufacture - for those, simply replace at the 3-year mark, or at the interval per the product manual.
- Inflate the life jacket using the oral inflation tube and let and it sit overnight with the bladders inflated. A noticeable loss of firmness in the morning indicates a leak.
- Test any strobes or personal locator beacons attached to the jacket, and verify battery expiration dates and replace if expired.
- Repack the unit per the manufacturer's directions, and don't' forget to record the annual inspection in permanent ink on the life jacket service record label.